My Wishing Well project

img_0287

There is so much room out here on the Ranch, I am obligated to fill up all the spaces with something interesting.

I decided I wanted a wishing well, but not just any wishing well, it needed to be big, and pretty.

So the search was on for inspiration.

I saw a pin for a fire pit of stacked retaining wall bricks, with the tops done in a mosaic.

We had leftover bricks from the old house (project that was never finished, imagine that?)

Dirty, grey, but they were so blah…. hmmm? how to fix that?

img_0351

I know, lets tile them with mosaics, that way the well will be pretty and magical!

Started by cleaning them with a brush and locating “pretty” stuff for them.

img_0328img_0376

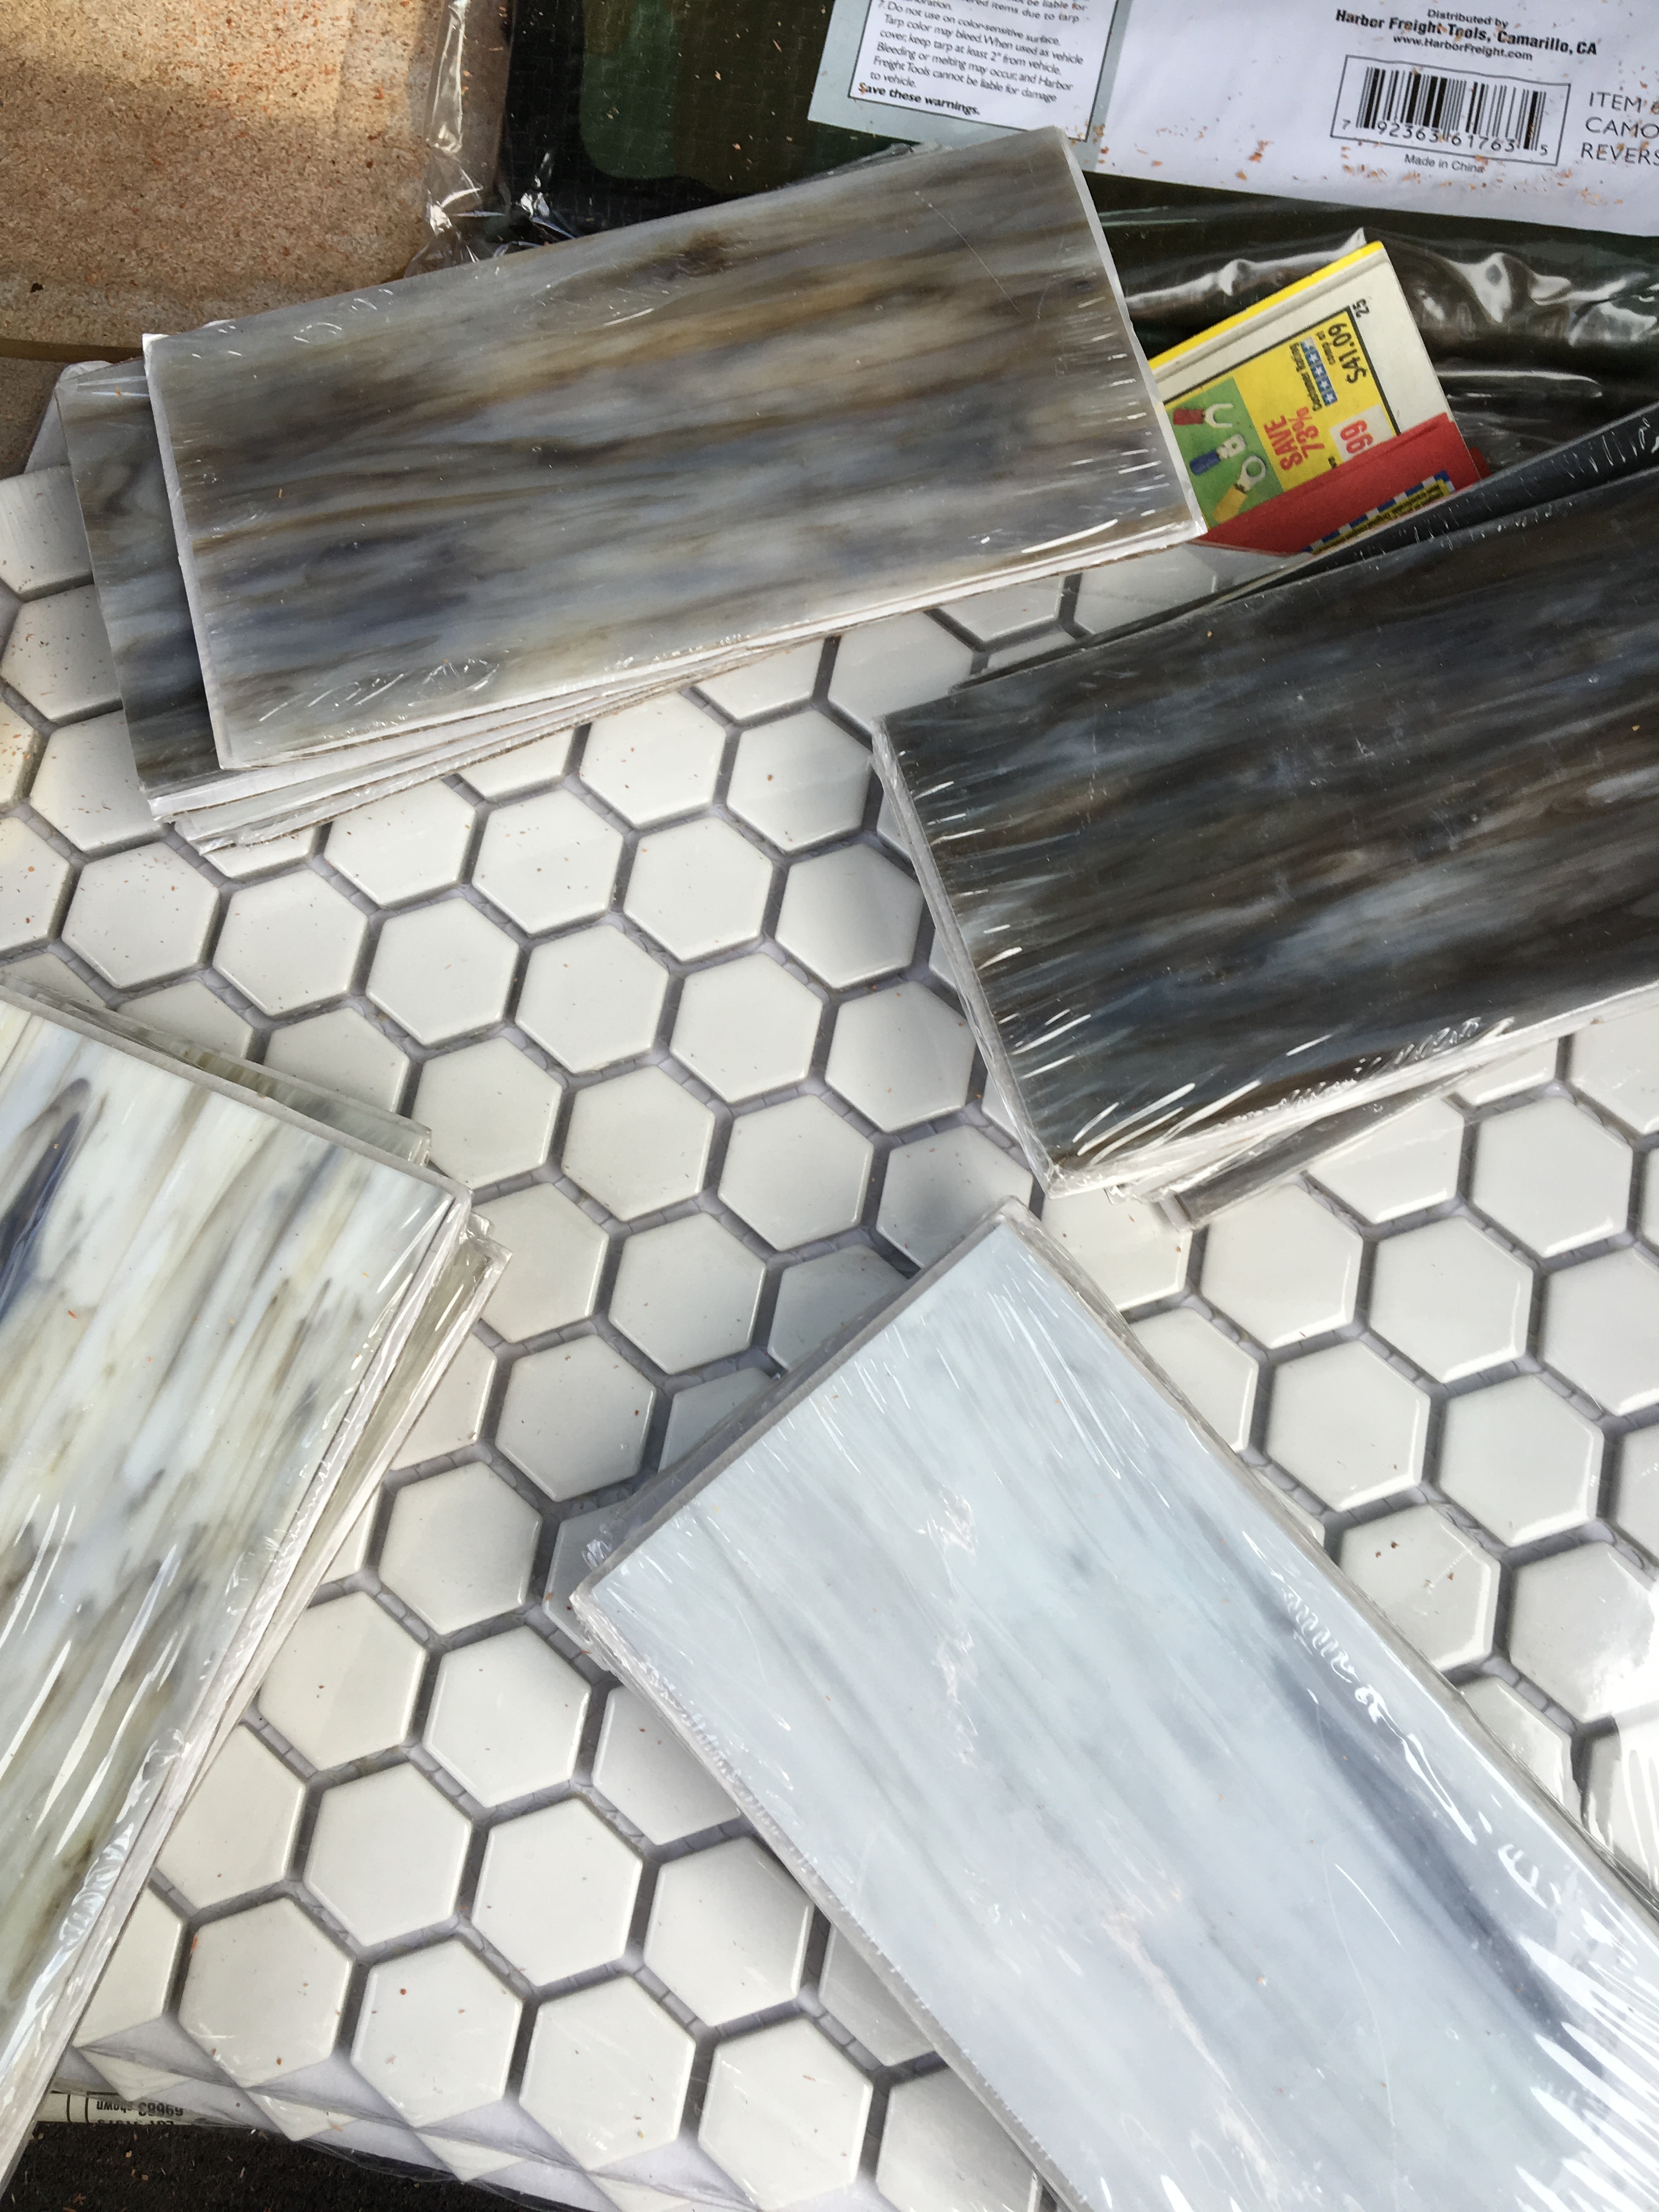
Discount glass tiles, and sparkly silver glitter grout from the clearance section at Lowes!

img_0348img_0352img_0354

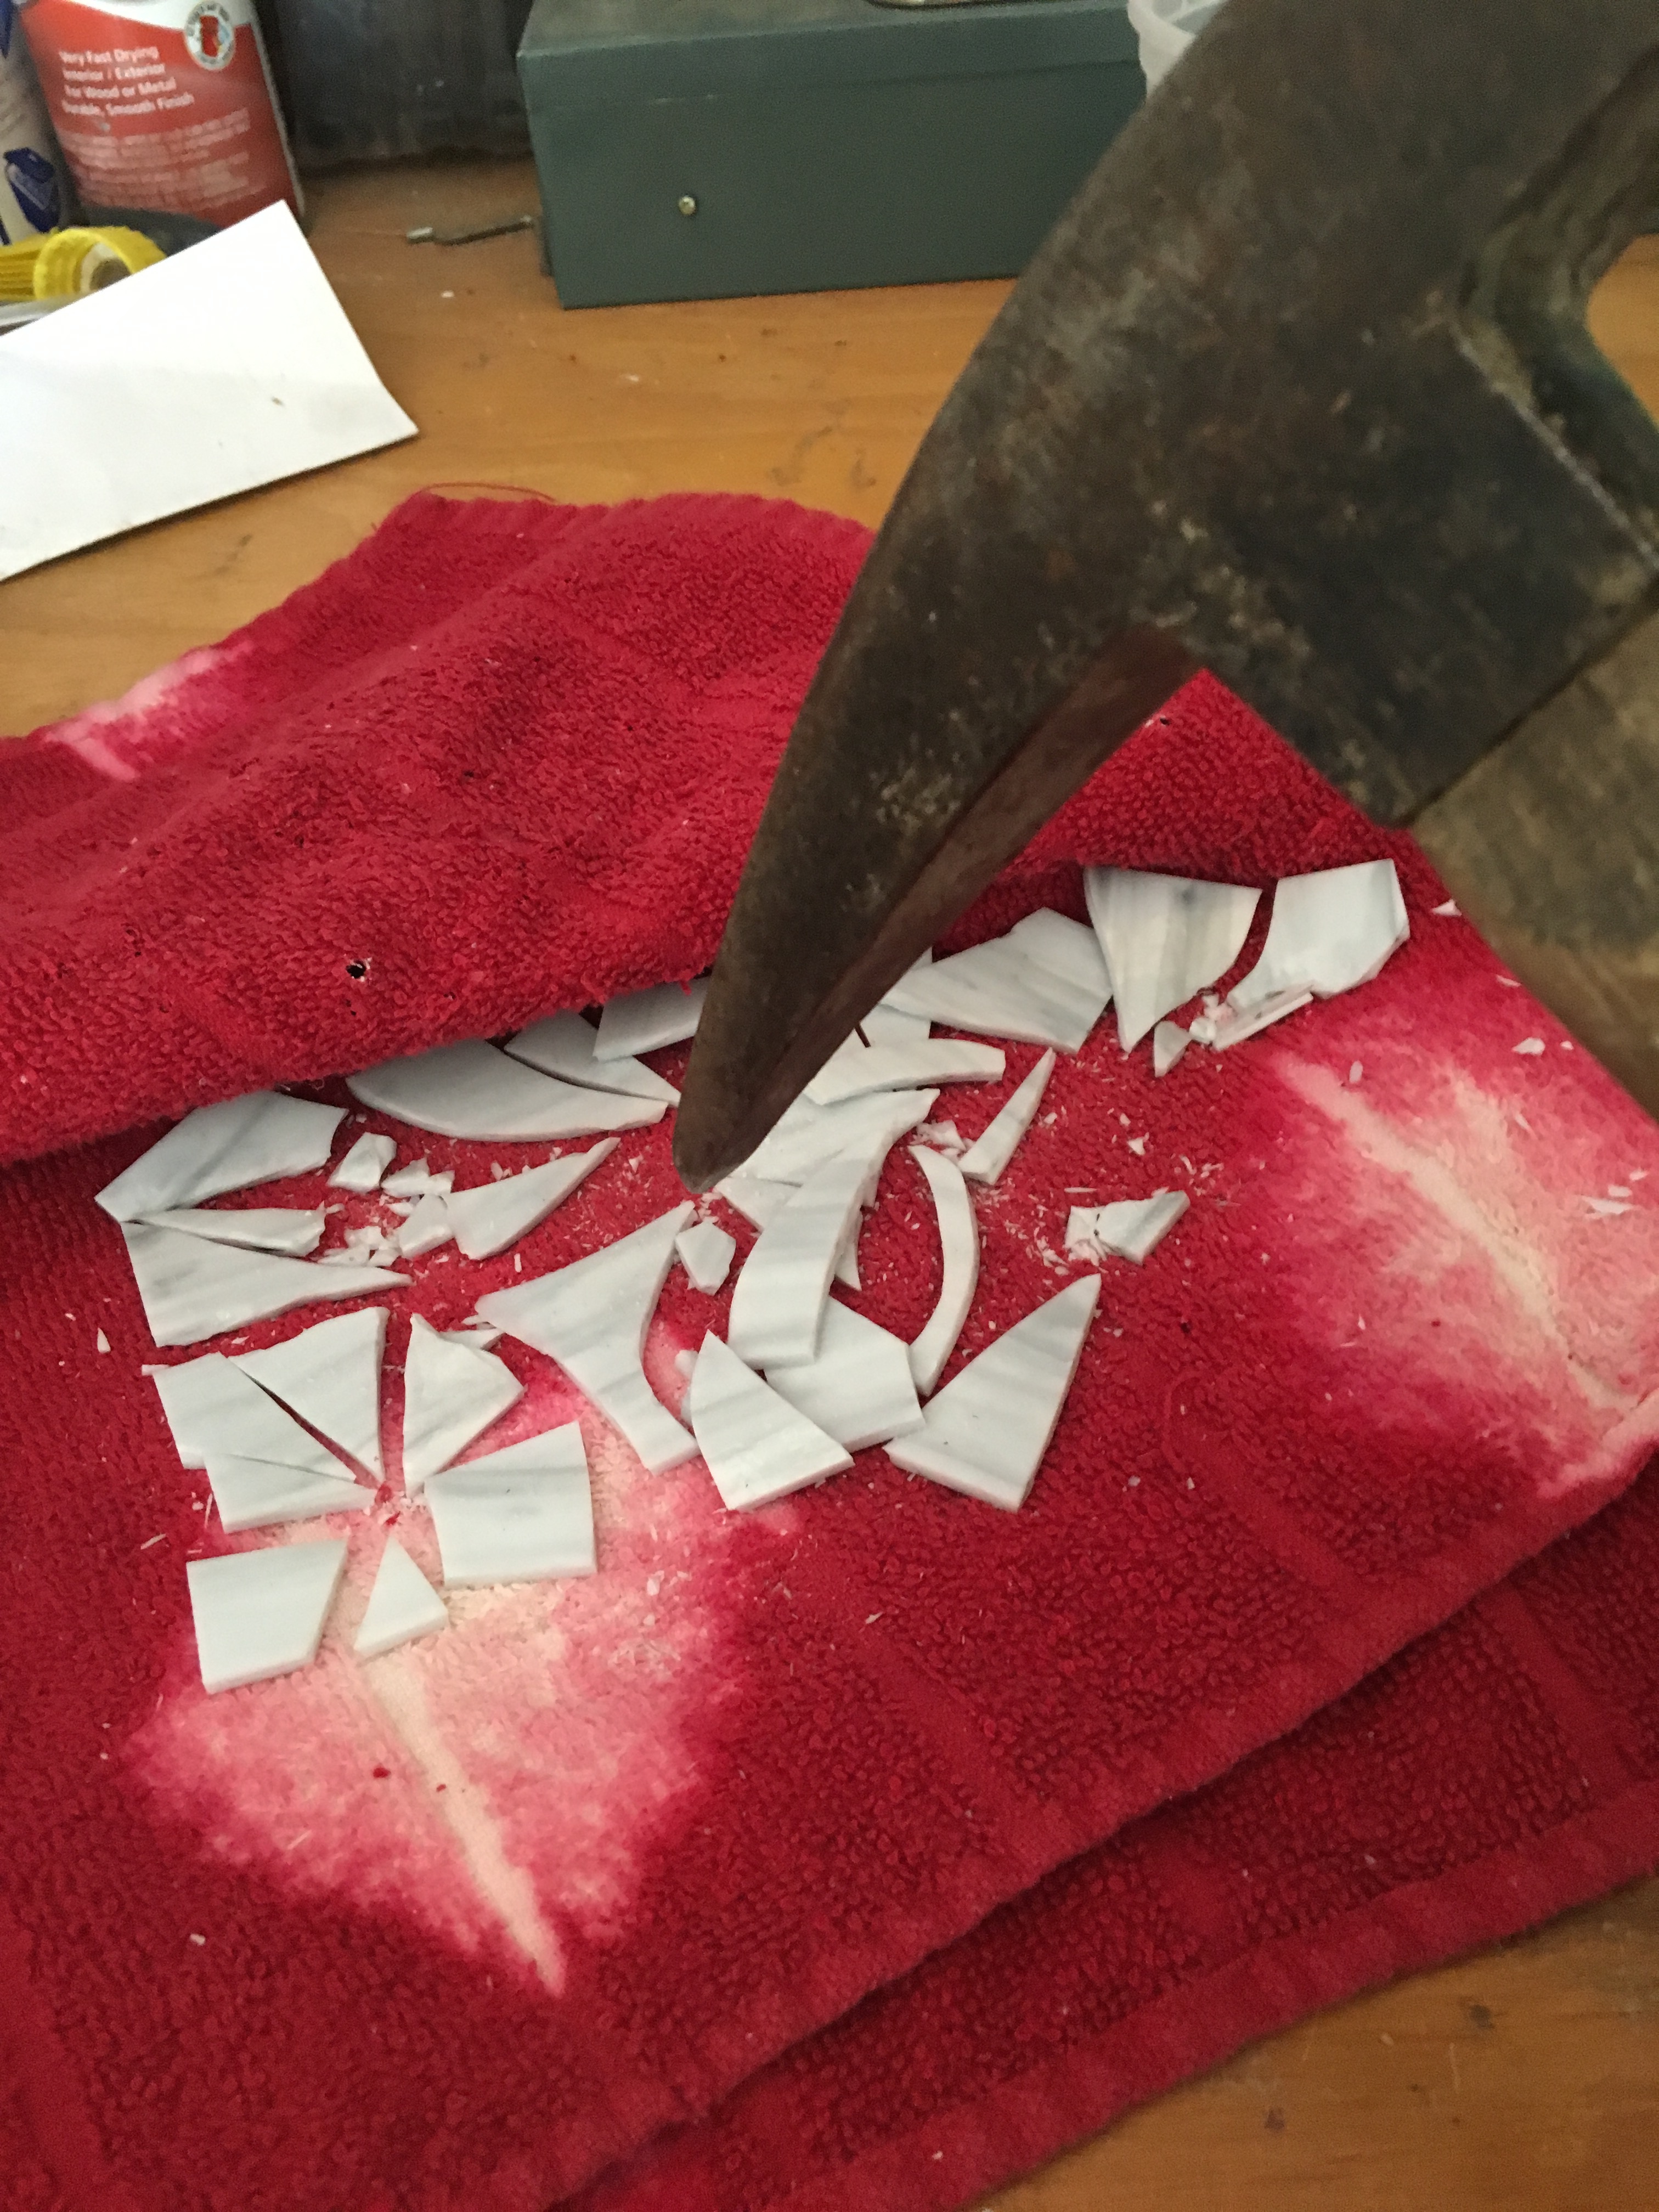
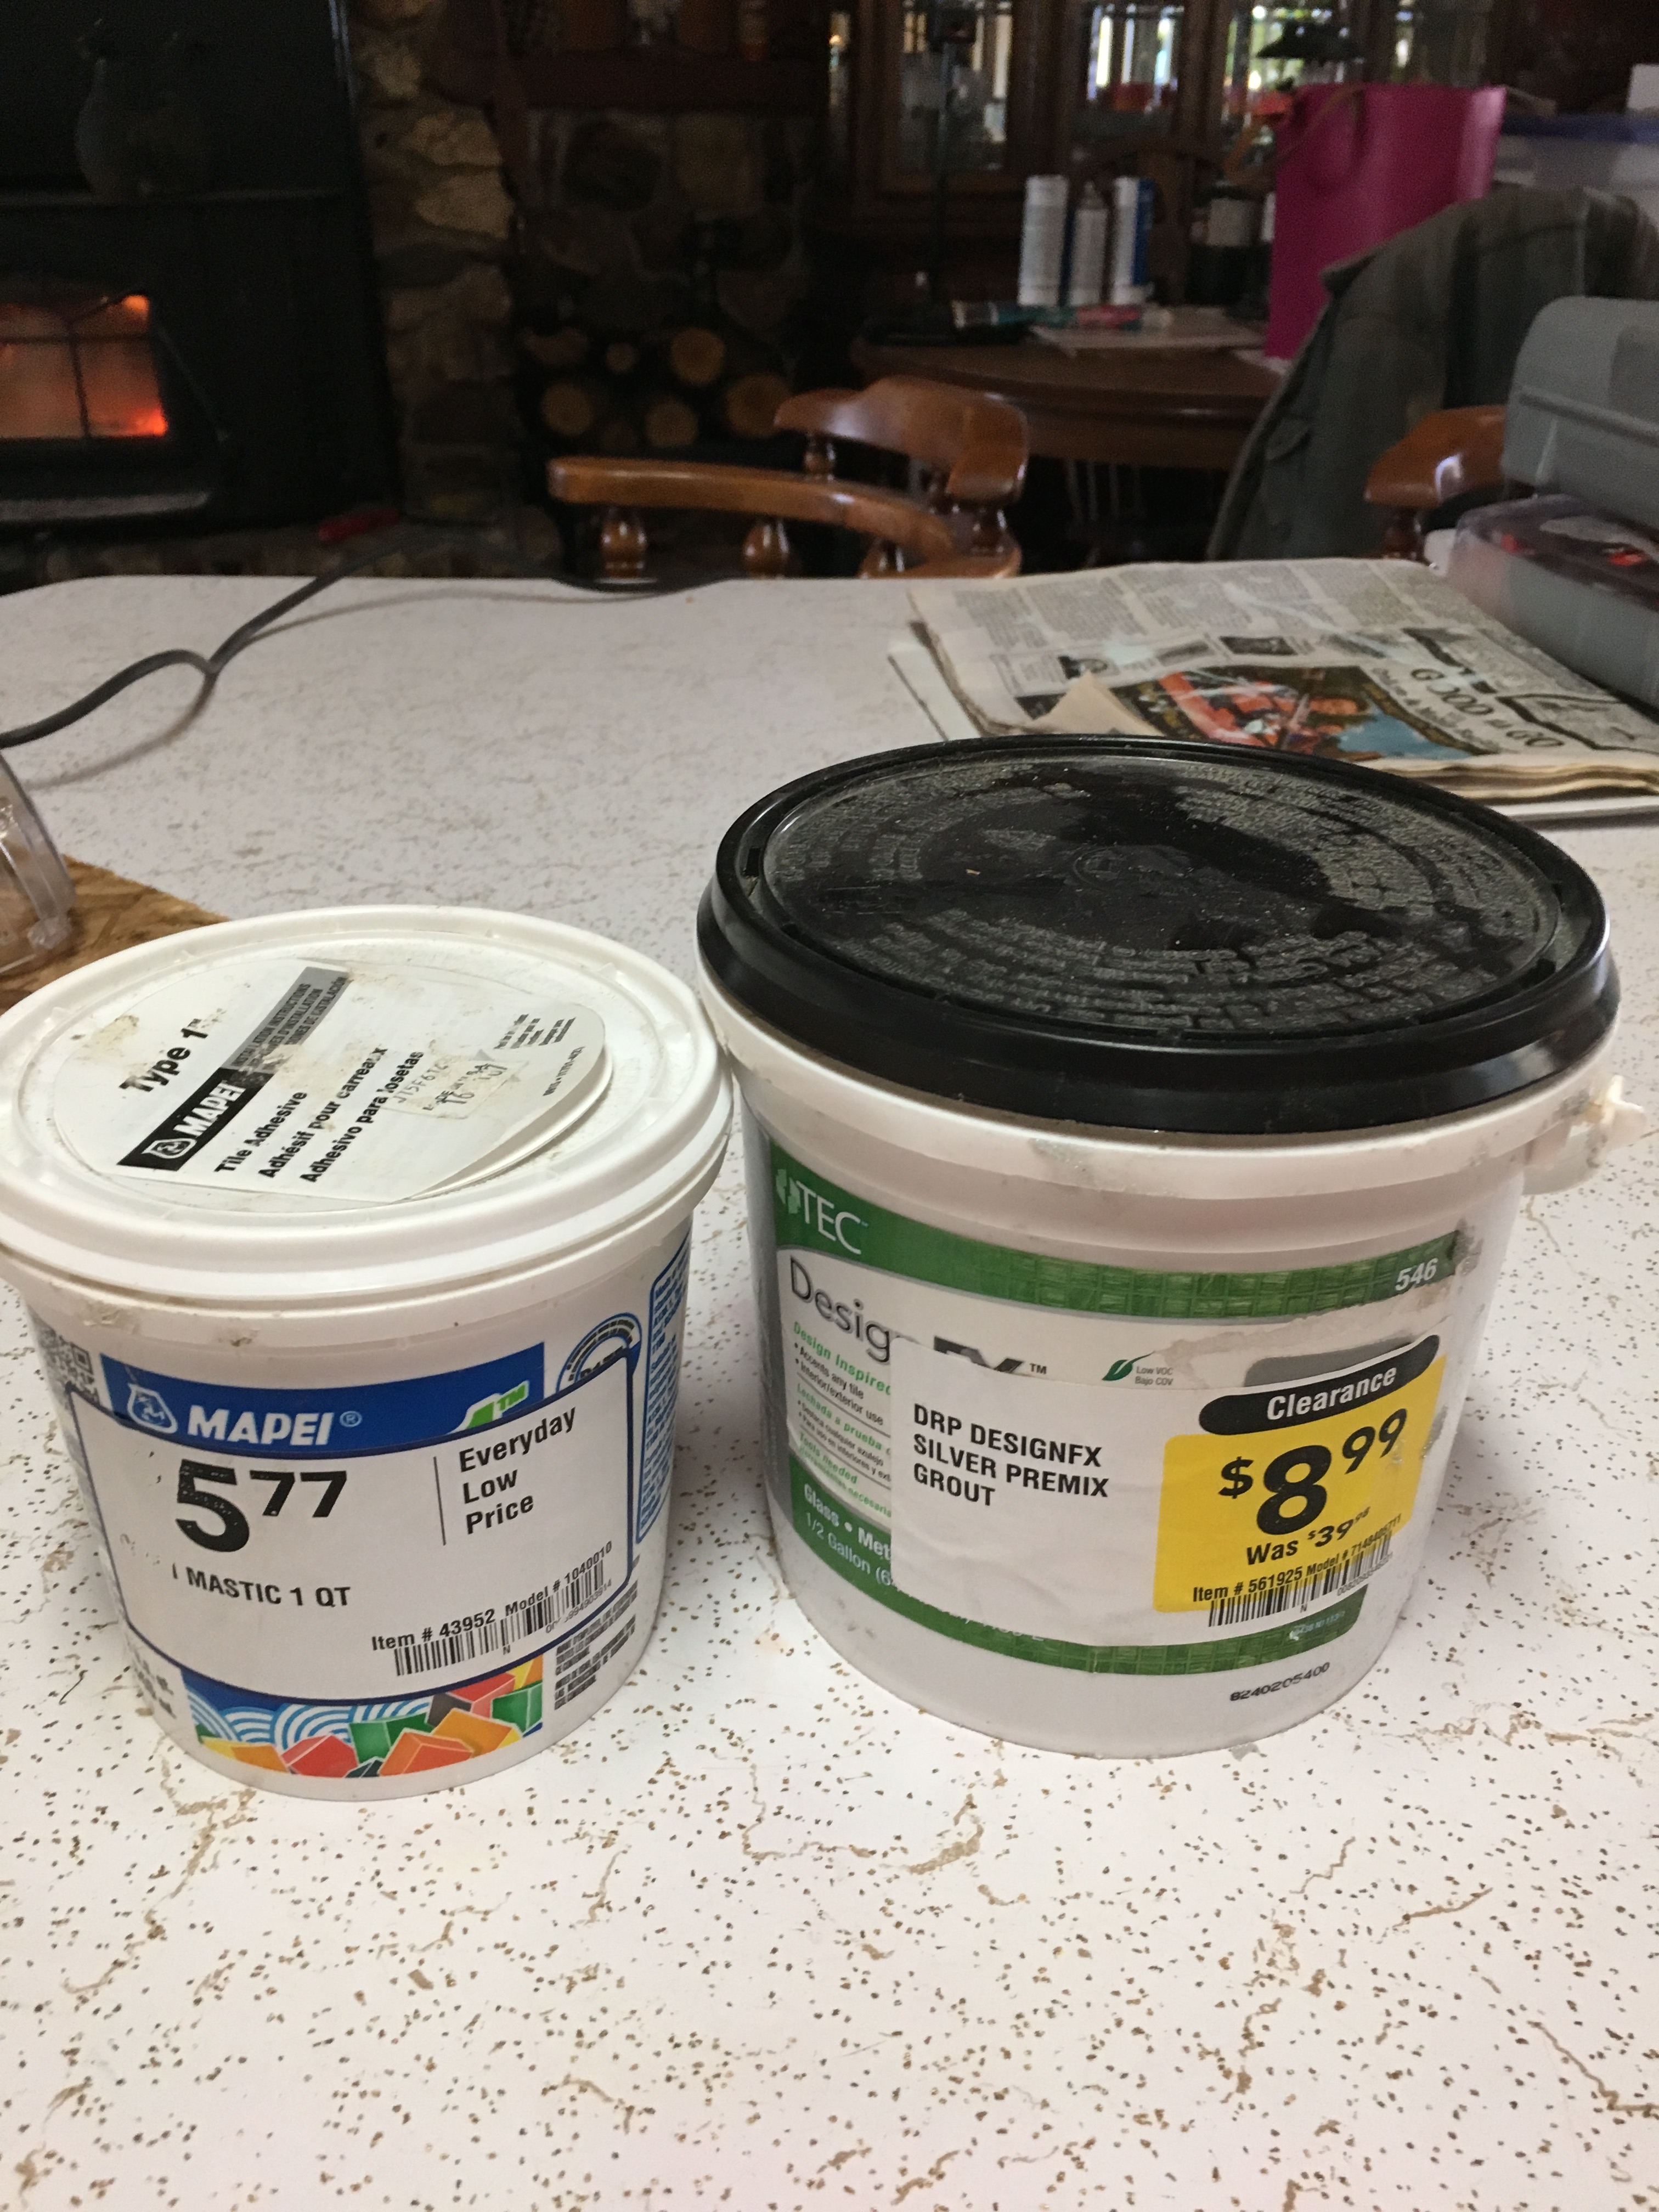
Use a towel when you break the glass tile, and lots of waterproof mastic. Gloves might have avoided cuts, but are hard to work in.

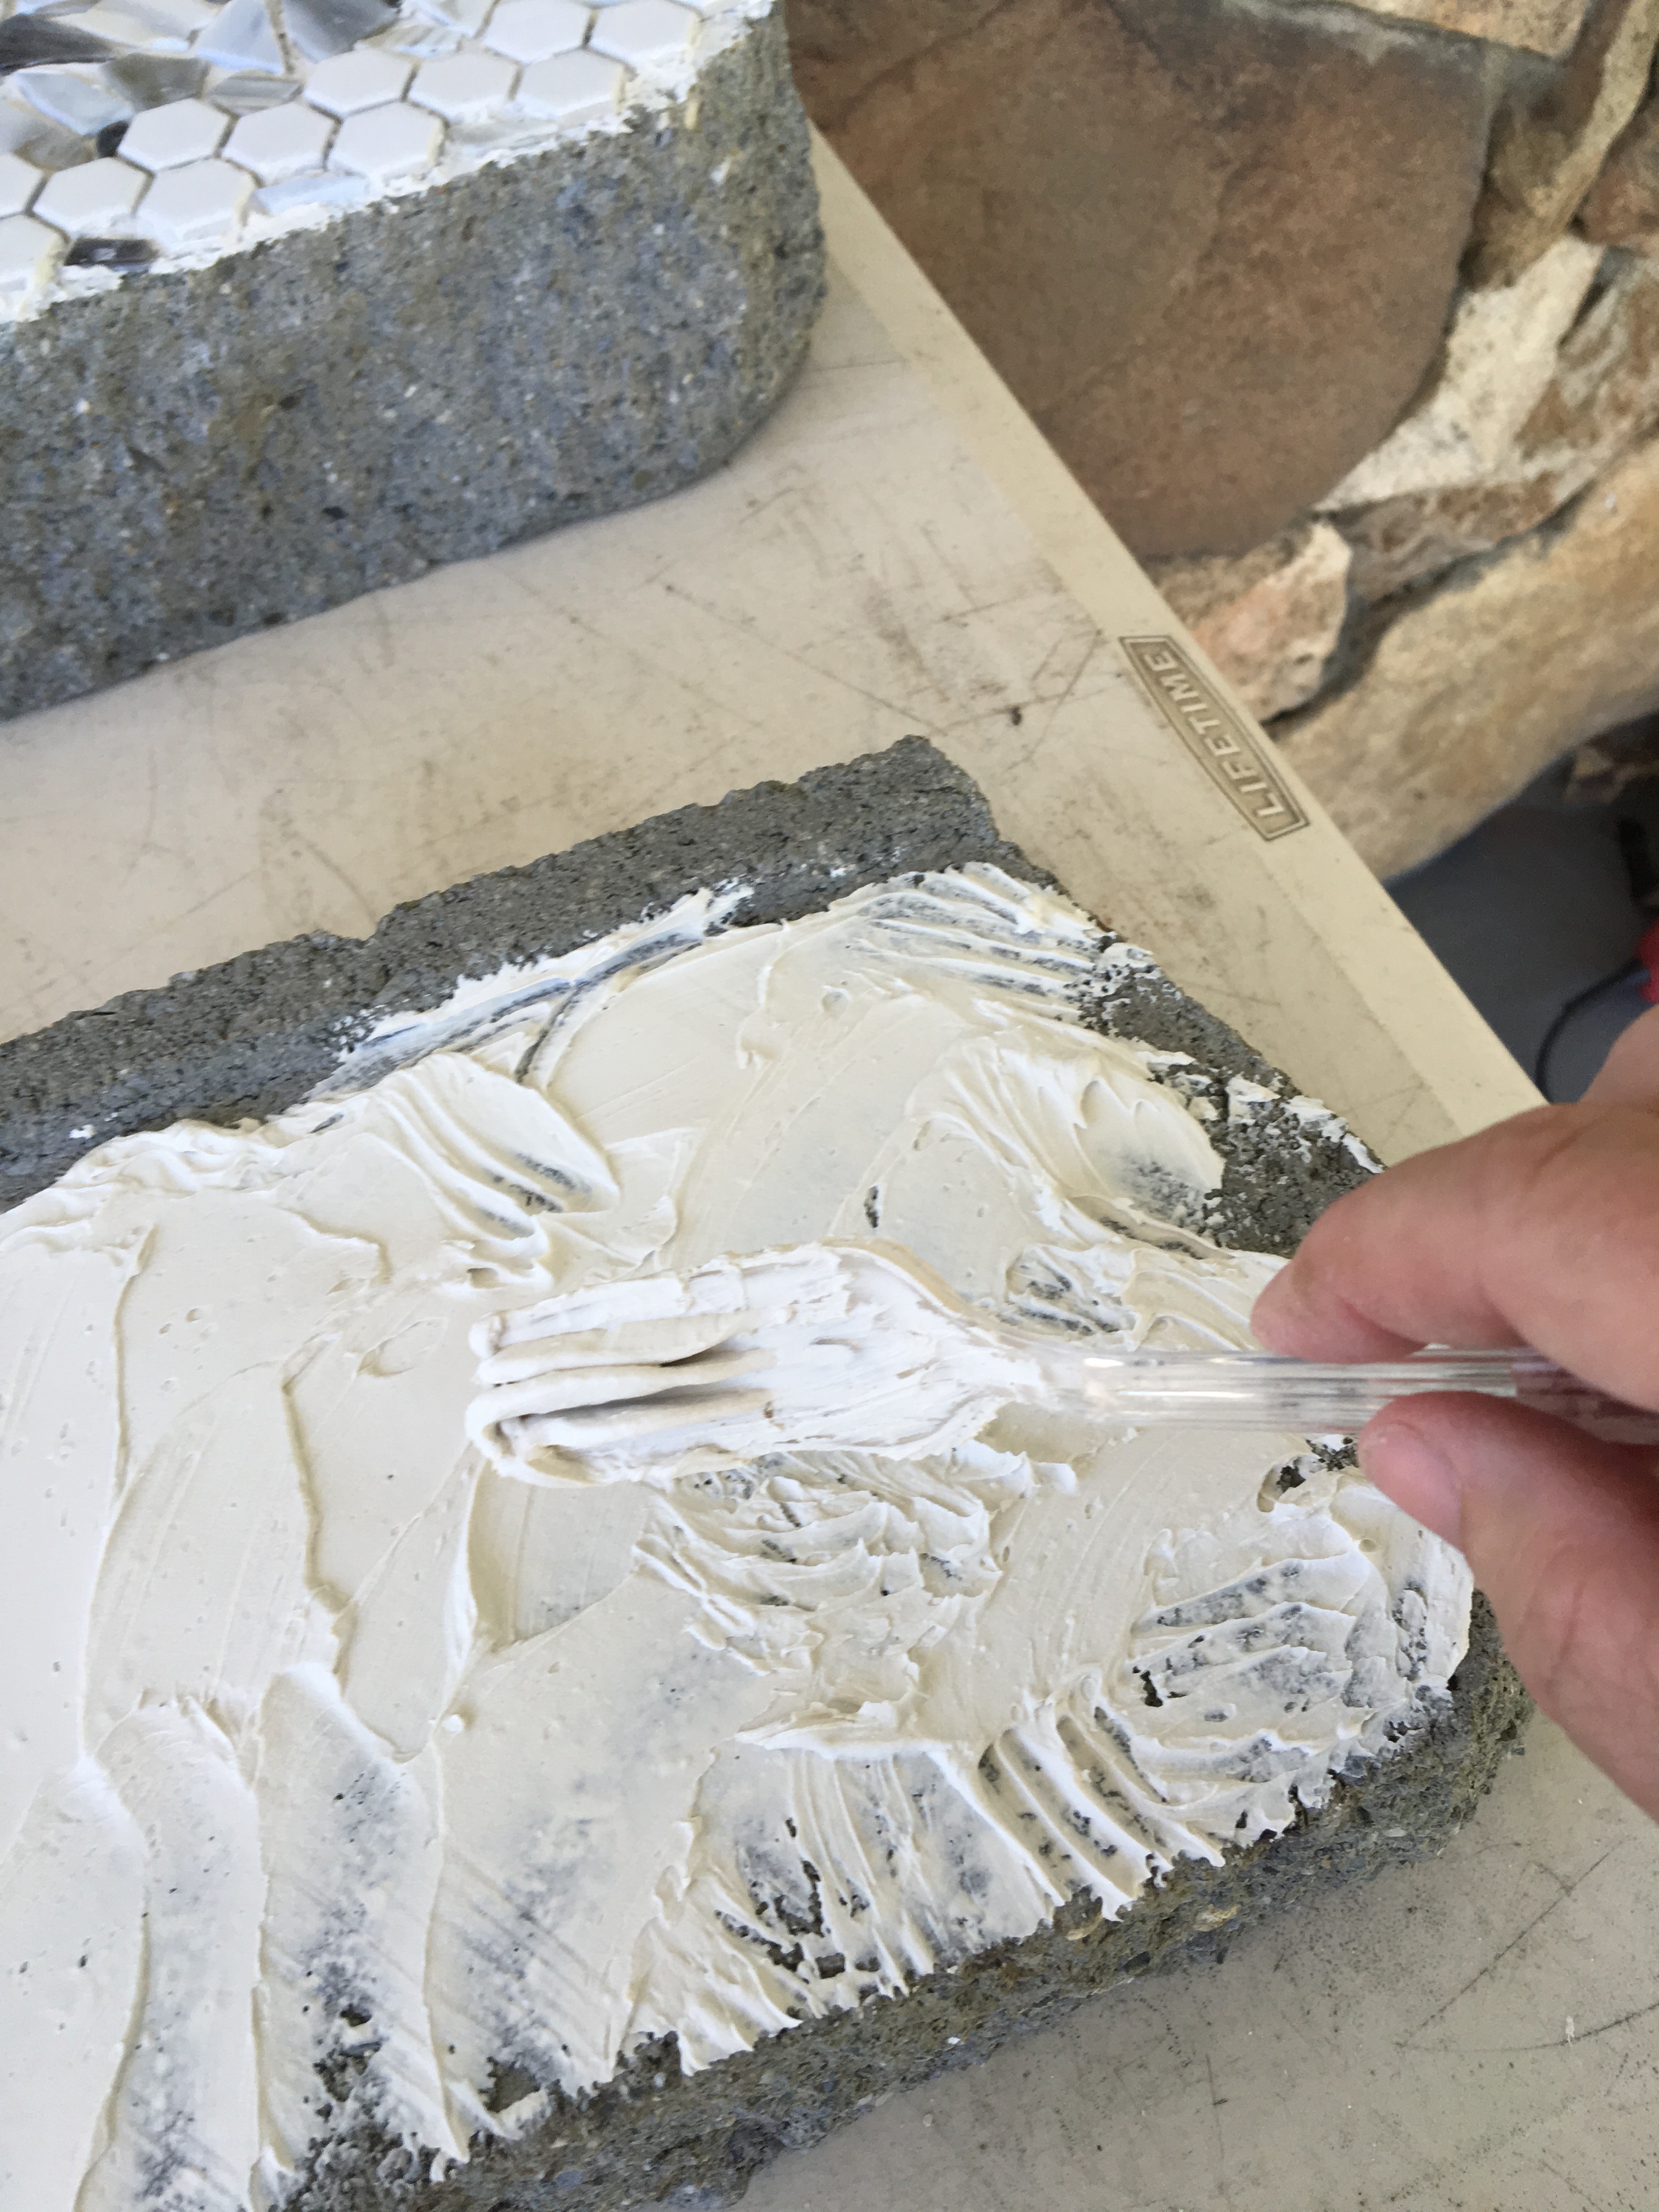
I put each color into bowls and lined up the top layer of bricks so I could spread out the colors evenly.

I wanted an edge on the outside of each brick, and the hexagon tiles fit perfectly 12″ across without having to cut any of them.

It’s always better to lay out your pattern before you begin gluing them down.

img_0355img_0358

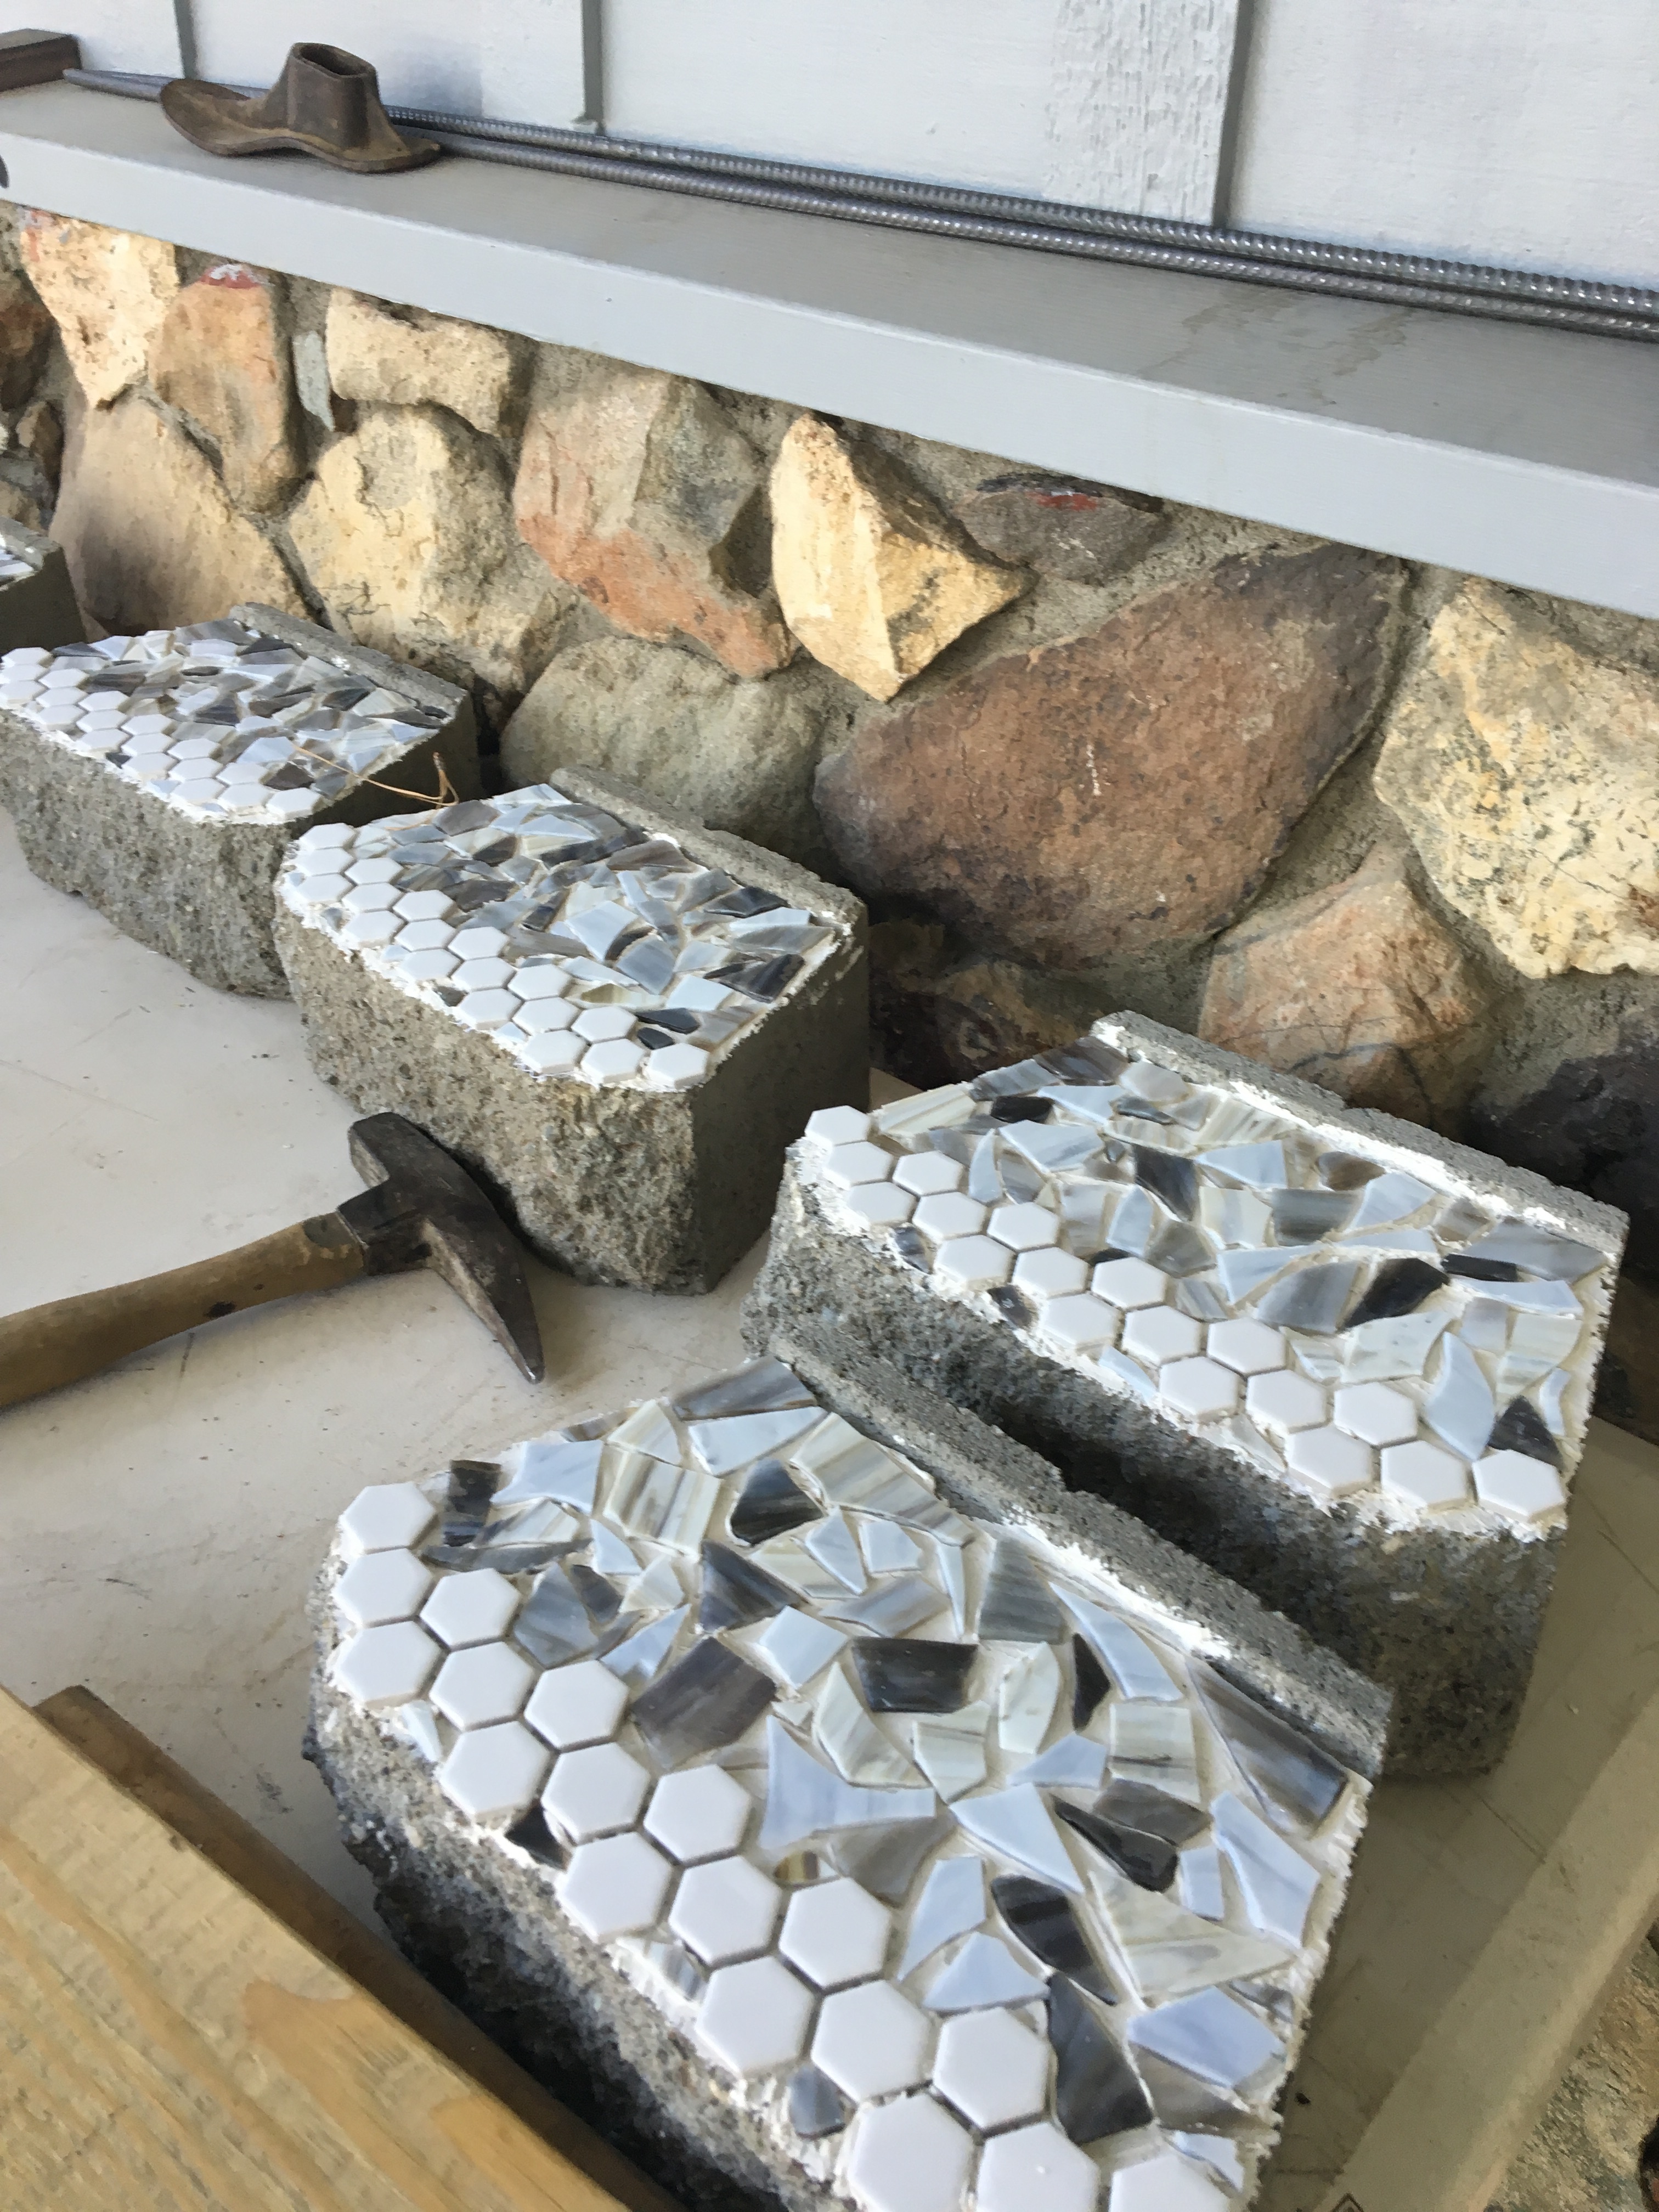
The grout plus the glass tiles make them really sparkly in the sunlight. Just simply stack the rounds of blocks and made this the last course.

img_0428img_0426

You could end it here, and make it into a fire pit, but I really wanted a wishing well. so it needs a roof.

Had hubby cut two support poles about 8 ft tall, put some angled support braces to hold the roof,

and attached each of them onto pier blocks hidden inside the circle.

img_0460img_0479

Next, we cut plywood into two 2′ x 3′ sides for the roof.

Since I wanted shake shingles and live in CA where they been banned, I had to make my own.

I purchased redwood bender board (super cheap) at Home Depot and cut them into 7″ shakes.

got to use the air nailer (that was fun) and covered it in staggered pattern.

img_0482img_0188

It was much easier to attach the roof out in its final location, as the shingles made it quite heavy

We put a piece of rebar trough the support poles and used an antique drill for the handle.

img_0287img_0213

Found a really cute turnbuckle to hold a bucket salvaged from one of the barns (nice paint included)

and filled it with squirrel food.

Love watching them swing and eat the corn and peanuts!

For the holidays, I hid a light inside that projected a white moving pattern that looked like magic water inside. (Think I’m going to leave it in there)

Enjoy,

Debbie 

The Fixer Upper


So, my followers,  its been a while since we last spoke. The back is doing extremely well following surgery, and I went back to work. Then suddenly, in December, BAMMM, work injury to my knee. Fell like a wounded water buffalo, and injured the PCL. So needless to say Gma found herself sentenced to 8 weeks house arrest, and a huge amount of bored. So while visiting our somewhat local Habitat for Humanity Restore, I found this darling little 1 bedroom 1 bath fixer upper. It came fully furnished, but was in bad shape.

(no amount of peptol bismol pink from the previous owners could save it)

But the price was right $25.00 bucks!

img_0310img_0354

So, the first step in any fixer upper, (after closing escrow) is demolition! Stripped the wall paper off, peeled up the vinyl flooring, removed the windows, and unsafe railing on the upper deck.

Made a couple structural improvements, to the base and back wall.

img_0321img_0327

We removed the hinged roof and decided to give it a shake roof. unfortunately, the cost of dollhouse shingles is over $20 bucks a square foot, Luckily, I found craft sticks at the dollar store and bought 2 packages for $2 bucks! Taped them together in bundles of 20, cut them to 2″ shakes. Used the yardstick to make straight lines,  and glued them on with wood glue.

img_0329img_0330img_0332

While the glue dried, we painted the entire place with Kilz paint. Cures all evils, stains, smells, bad paint choices, and seals the bare wood. Making it a nice blank canvas to create!

img_0328img_0360

The back roof panel is glued and screwed secure, and the front is hinged so they can open and play inside the attic.

Next, I decided on my color palette, the pink I was stuck with, Hubby convinced me not to paint the vintage Barbie furniture it was mostly pink. But I had some leftover Minnie Mouse print and added a few fat quarters in a pretty blue to balance out the pink overload! Yep, there was sewing and construction involved! I painted the outside walls “Tiffany” blue, and added white trim molding. It helped stabilize the house.

img_0323img_0386

Flooring is next, since there was a kitchen and bath, of course I tiled it! After doing projects on our real homestead, I consider myself a self-taught expert! I had leftover tiny hexagon tiles and added 2 sheets matching tile with black tiles (looked like flowers to me) I still had adhesive and silver sparkly grout leftover from the wishing well project, so it really only cost $6 bucks for tile. ‘

img_0377img_0375img_0374

The bedroom, living room and attic needed wood floors. I was in the local flooring store, and found 3 planks of snap together dark stained real wood flooring. The guy just gave it to me since they were samples. All I had to do was measure, cut and snap together. Since is was so thick, no need to glue or nail it down. (hope she doesn’t trip between rooms, lol)

img_0378

Windows needed replacing, looks like they used page dividers and a sharpie to make them. I splurged on Ikea 5×7 frames ($1.99 ea) and just glued them in place.

img_0317img_0392

It’s not complete unless the patio is covered. Lowes kindly donated a scrap of Astroturf so she can relax with her shoes off. (all I had to do was ask!) Decided to do a more substantial railing. Since I was using black as an accent, decided to try it on the top rail. Used the same molding I had put on the corners of the house, but painted it gloss black

img_0382img_0426

So this whole renovation took about two weeks, with drying times, so I had plenty of time to sew accessories and cover the 70’s Barbie fabric.

The sofa and chair pads got recovered and the pillows. Made all new bedding (yes, I did fitted and flat sheets, duvet cover, bed skirt and pillows) all new curtains and drapes with fancy beaded finials on the curtain rods.  I hung them with command hooks, the rods are 1/2″ dowels, cut to fit the windows.  I was considering cup hooks but the walls are paper-thin and they would have come through the outside. I sacrificed a white bar towel, cut it up, hemmed it and added appliqué hearts for the bath.

img_0427img_0428img_0396img_0418img_0419img_0420

I decided to put “puck” lights in the rooms, easy for them to operate, but they kept falling off. I used my go to E300 super glue to attach the bases and problem solved.

The attic isn’t complete yet, think I want to put a closet pole (small metal towel bar?) across the side and hang her clothes up and maybe some cuter storage bins for her shoes and accessories. You know ladies, make it a “dream” closet, right?

img_0421

And lastly, don’t miss the family picture above the sofa, it’s the best part!!

So I encourage you to do your own fixer upper, it was a blast! Maybe I can tackle a real size one?

Enjoy!!

Debbie

.

Playtime in the Car II

Another quick way to entertain that back seat driver. This one took literally minutes to assemble, but days to collect the teeny tiny items for inside.

img_0336

Yep, why spend over $20 bucks on the store eye spy jars when you can do your own.

Hardest part was cleaning the labels off the Voss water jars. I found mine at Burlington for under five bucks each. The plastic ones have sticker labels on them and are lighter for little hands to shake. The glass ones have painted labels and are heavier. I did both, plastic for Dolly and glass for Gma’s camper. You can use any empty, clean, clear and dry bottle you might already have. The Voss bottles do have a larger opening then the water bottles so we could add slightly bigger items to them.

img_0335

All you need is an empty water bottle, lots of teeny tiny items for them to search for, and some rice to hide them in. I think I put over 50 different items in each jar, I also kept track of what I added so I could print out a checklist later on the computer.

Finding items was like a grown up scavenger hunt, Even Papa got helpful once I showed him the project. I’ll give you my list at the end.

Just use a funnel to pour the rice in, and drop in your bits and pieces as you go.

Be sure to leave some room at the top for shaking around, And be sure to super glue the lid on. You don’t want this spilling out all over the backseat!

img_0337

We did ours during a camping trip and the “helpers” played with them all weekend. Think we offered a prize for the person who found the peppercorn.

img_0336


All in all a fun project, I still find things I want to add, but the lids are glued and I think 50 plus is enough to find. I did print a checklist of items inside. Think the adults are more competitive about finding the harder items but it gives the kiddos what to look for.

ENJOY!

DEBBIE


Items in my bottles included: Lots of Bead and Buttons, Items from Papa’s garage, and a few minis I purchased.

BASEBALL 

LADY BUG

BASKETBALL 

LEAF

SPARKLY BEAD

LEGO BLOCK

BEE BUTTON

LIGHT BULB

BIRTHDAY CANDLE

LOCK

BOLT

MATCHSTICK

BOTTLE CAP

NAIL

BREAD TAG

NUT

BULLET

OWL

BUTTON

BARBIE SHOE

CHENILLE

PEARL

DOG

PEPPERCORN

DR SUESS ERASER

POMPOM

FISH

POPCORN KERNEL

FLOWER

PUMPKIN

FOOTBALL

QTIP

FEATHER

ROCK

FUSE

SCREW

SEASHELL

SMOOSHED PENNY

TOY CAR

SPOOL

“H” for HAILEY

SPRING

HAIR CLIP

STAPLE

HAIR TIE

STAR

HEART

SPIDER

JELLY BEAN

TACK

JINGLE BELL

TEDDY BEAR

KEY

WASHER

KITTY

WIGGLY EYE


Playtime in the Car

Here’s a quickie I made for my Grandniece Dolly’s car trip to Disneyland. They’re driving down, and I remember those days of trying to keep an excited

5-year-old entertained in the backseat. I made her a travel box with stuff to hopefully make the ride smoother.

img_0364

First up was a travel tic tac toe tin. I found a small metal tin in the dollar bin at Target and it was already red! So I added some cute washi tape around the bottom and painted her a Minnie Mouse on the top.

img_0365

I used a small ruler and permanent marker to put the grid on the inside of the lid.

img_0363

Collected some bottle caps from Papa, he was happy to help. You need 10 total, 5 of each color. Some button magnets and outdoor glue, attached to the back.

I painted mine black and red, and put a mouse outline on top. You can do whatever shape, or theme suits your kiddo.

img_0367

I also made a backup set of caps, using a punch and putting the images inside the cap and the magnet on the back. (I’m sure some of these will end up under the seats! Sorry Mom and Dad…

Enjoy!

Debbie


Minnie Inspired Headwrap

img_0425

OK, it’s been a while since I last posted. Let’s just agree it was a year not to be forgotten. I’m happily recuperating from back surgery and finally feeling more like myself. “the Happy Crafter” so as we are planning baby Hailey’s first birthday celebration in Disneyland, I’m inspired to make some goodies! If this one looks familiar, it is a variation of the 10 min table runner. Of course, you want to wear a table runner on your head, right? But I was looking at the retro head wraps on Pinterest thinking….. Disney inspired but not soooo mousey.

Supplies needed:

5″ X 36″ dark colored fabric (this is the back and edge fabric)

3″ X 36″ pattern fabric (for the center panel)

thread to match or contrast

Sewing machine or Serger

Steam Iron

And about 10-15 mins to assemble


As you can see, I choose a large polka dot in red and pink, and small dot black and solid black. This is what happens when I can’t make up my mind, I choose them all! There’s 10 of us going, so I made several options for us to share.


img_0405

I like to cut on a mat with a guide. Cutting straight seems to not be my strength. Cut the backing and edge fabric 5″ and the center piece 3″. I just left the length from the fabric store (44′ i think) and trimmed it after I put it together.


This project is so easy, I would totally recommend it as a mom/daughter learning to sew tutorial. Let them pick the fabrics and do the cutting and sewing.


I measured around my head, it was about 24″ so I added 12″ for the ties and came up with 36″ total. You can alter that measurement shorter if you are sewing for a child, or add if you have that one friend with the really big melon.


Sew the right sides together, I used my serger, one of the best investment I’ve made in crafting. But you could totally do this on a basic machine. Make sure to get good seams and turn right side out. Press the tube with the seams outward toward the edge.


img_0410img_0411

Now the tricky part, creating the ends. It’s really quite simple, fold the tube backwards. Yep, with the back edges even fold lengthwise.

img_0412

Then sew shut the short end. This make the point when you fold it down. Be sure to use your scissors or other pointy thing to get the point out, if sewing on a conventional machine trim the fabric to reduce bulk in the point.

img_0415img_0416img_0417

See? it’s really quite simple!

Now all you need to do it tie it around your noggin!!


img_0424

img_0419

There they are…all dozen Minnie inspired headbands, can’t wait for vacation!

Enjoy!

Debbie


Faux Milkglass Trays

So we all know how cheap I am. Why buy it, when you can craft it right?

That is why you’re looking at this post in the first place, we’re alike.

This is the initial mock-up for the dessert table.

Chalkboard, vintage black, white and silver. It will be redone about a hundred times, and until I place the last cake pop, is subject to change.

IMG_2070 The wedding colors will be accents (Sea glass blue and blush) flowers in delicate pastel, pretty beachy shades.

Cupcakes, cake pops, and baked goodies will be the final touch!

So lets focus on the base of this arrangement.

To make the faux milk glass serving platters:

Supplies needed:

Assorted plates, platters, candlesticks, dessert bowls, vases and glasses.

White gloss spray paint

Waterproof, outdoor glue

IMG_2011

After a hasty trip to the dollar store, I purchased several platters, candle sticks, dessert bowls and glasses.

Spent about $20. but should come out with 10 serving pieces, and three vases for fresh flowers.

IMG_2015

First step is to wash and remove all stickers, oily film and prep your glass items.

I use the Goo-gone to remove stickers and ink, then rubbing alcohol to remove the goo gone. (Its oily and the glue won’t stick well).

IMG_2016IMG_2017

Attach the candle sticks to the candle plates, the dessert bowls to the oval platters…you get the idea, using the glue.

Center them so they will balance when turned over. Allow to dry overnight, since you’re going to paint it, it could dissolve the glue if it’s not set well.

IMG_2021

Be sure to cover your work area well, and spray away!!! I did two coats on most, some needed touch-up after I turned them over.

Allow to completely dry or you will risk fingerprints in the paint. (No, I didn’t learn that the hard way)

IMG_2059

These were my favorite, candlesticks and a candle base. The glass was heavy and they turned out nice.

I’ll be putting cake pops, cupcakes, and assorted baked goodies on all of them!

Rehearsal Dinner is my chance to impress my son’s future family, and introduce them to ours.

 I come from a long line of crafty ladies, who would rather spend $75.00 in supplies and make something with LOVE, than allow anyone else to cater or design for me.

Enjoy!

Debbie

Margarita Bar Towel

Ok, so I’m going to blame Frank for this. Was it his fault? No, I never said that, I just said I was going to blame him.

IMG_2125

So, you ask how was this his fault? I bought him a shirt for the rehearsal dinner. (In case you didn’t know, youngest son is getting hitched in June) and I asked him to try it on. Several times I asked him to try it on…. I got an XL because I loved the shirt, and they didn’t have a large. I’m pretty handy with the sewing machine, and I figured I could just take it in some. Problem was, he wouldn’t try it on while I was available to mark it. Long Story short, he tried it on alone, told me it was really big, and I took it upon myself to take it in, sans measurements. Needless to say I took it in too much! Ugh! A perfectly good, Jimmy Buffett Margaritaville Shirt, too small!!

After blaming him relentlessly, and a good nights sleep. INSPIRATION!! Bar towels for the Margarita bar at the rehearsal dinner. GENUIS….

Supplies needed:

One super cool Magaritaville Shirt (made too small) or any other print you’re fond of

Colored bar towels to match fabric (mine were 16″x19″)

Simplicity pattern #1483 (make sure you get these on sale)

Sewing machine and some time to kill

IMG_2131

So early this morning, scissors in hand, I chopped up what was left of the shirt, removed the super cool buttons (they say Margaritaville on them) and began redeeming my sewing confidence. I did use a pattern, Simplicity #1483, since I really didn’t want to screw this up. This pattern retails for $17.95, but if you watch for your local fabric/craft store sales, they will go on sale for 5/$5.00.

I picked this one up months ago during one of those sales, and finally used it on this project.

IMG_2128

I may have spent a little too much time attempting to get the coolest parts of the fabric strategically  placed. Could of probably gotten another set of tops, but I tend to fuss over details.

Worked out OK, I got five tops, and the package of bar towels came with five!

The tissue pattern made it easy to see placement over the prints.

You could totally do this without a pattern, in fact next time I will improvise the front flap into a curved or squared shape instead of the point.

Just make a newspaper square about 8 1/2″ X 4 1/2″ for the base, a 5″ wide middle piece, and 6 1/2 x 4″ flap.

The overall size approx 9″ x 9″.

IMG_2127

When cutting them out, I did utilize the sleeves (the already hemmed edge) for the bottoms of a couple of the towel tops.

IMG_2129

If you are using an obvious one way print, be sure to cut one side upside down. Because after you sew them together, the “flap” needs to be upside down so its right side up when finished.

Sew according to directions, right sides together. leaving the bottom open. Turn and press a hem along the bottom edge (some were already done) and stitch that down.

IMG_2130

The pattern calls for velcro on the flap to attach, but I opted for a button/buttonhole option. The buttons from the shirt were cool, and since my “Opal” does them automatically, why not?

Next step, I removed the hem from one of the short sides of the bar towel. (to reduce bulk) and gathered along that edge.

IMG_2134IMG_2132

Another of Opal’s super cool attachments, is this automatic ruffler. Made gathering the towels super easy and fast.

Next, I just put the gathered edge of the towel inside the top, the pattern calls for it to be sewn along the bottom edge, but my towels seemed long (I didn’t trim to 13″) so I put them all the way into the square portion. Pinned the corners and across the top, then topstitched across and down each side to secure the towel inside.

IMG_2136

Final step, I sewed the buttons on, going through the front and the towel, but not the back of the topper. (that made it pucker, and I didn’t like how that looked)

IMG_2137

There they are… Margaritaville Bar towels, ready for the Margarita Bar at the Rehearsal Dinner!

So when you screw up, pretend like you meant to, and look for inspiration to cover it up!

Enjoy,

Debbie

Chalkboard Cornhole Game

IMG_2001

Well, as promised…. another chalkboard project is wrapping up. Cornhole (Bean Bag) game for the rehearsal dinner.

The lovely bride’s mother requested some yard games for the rehearsal dinner, and we were all too happy to oblige.

I’ve wanted one of these for camping and what better reason than a June Wedding, to kick us into gear.

I really can’t take credit for the boards except that I insisted hubby build them to specifications.

Lucky for me, he’s quite handy and lets me boss him around.

IMG_1972

He’s construction, I’m design, we work well together.

I looked online at the DIY network, and found the correct dimensions, and simple enough plans to construct the boards.

http://www.diynetwork.com/how-to/outdoors/structures/how-to-build-a-regulation-cornhole-set

IMG_1973

I couldn’t decide on a paint design, so since I’m all about the chalkboard lately, that seemed like a perfect finish.

We stained the sides and legs with a golden oak finish, and I painted the tops with two thin coats of chalkboard paint.

IMG_1987

They turned out wonderful! The legs fold under for storage and transport.

Next, you need some corn bags. I guess in the south the bags are filled with corn, elsewhere beans. Who knew?

Just be sure not to leave them out in the rain, the corn will expand and mold!

There is a specific size and weight for the bags. They are supposed to be 6″ x 6″ in size and weigh exactly 16 oz.

IMG_1988

So I cut the fabric into 7″ squares, and used my serger to close 3 of the 4 sides with a 1/2′” seam all around.

If you don’t have a serger, just sew them front sides together and turn them out.

Fill the bags with the proper amount of corn (I used a food scale with the bag set on it) and slipstitch the opening closed.

A good source for the corn was the new Tractor Supply store. I got 50# of feed corn for $12. bucks!

It made 6 full sets of bags, way more than I needed, but I think they’ll be great gifts.

A tip for filling and sewing the bags closed was pinning the open end horizontally to hold the corn inside, while I serged it closed.

This kept the kernels from spilling out and losing the proper weight, and also prevented them from getting under the needles of the machine.

IMG_2045

I did some in burlap too. And two different camping motifs!

I also made a storage bag for the corn bags with leftover fabric and cording. And added a pocket to hold the chalk!

Sadly, I didn’t get enough photos to make this post truly user-friendly, but I think you get the idea.

Psst, I had him make two sets of boards so I get to keep one for camping!

In case you’re not familiar with the rules of the Game, It’s really quite simple!

You play similar to horseshoes, tossing the bags from either side into the hole.

Generally tournament play is teams of two people, opposite each other at the top of the boards.

The boards are placed 27 feet apart facing each other.

(Be sure someone sober measures before you start!)

Bag in the hole scores 3 pts.

Bag on the board 1 pt.

First person/team to 21 pts. Wins!

Now, play responsibly and be sure to use good sportsmanship at all times.

Enjoy!

Debbie

My First Chalkboard Project

IMG_1818

Hello my crafty friends, I know it’s been a while since we last spoke. But we all know how quickly time runs away from us.

So, let’s see if I remember how to get this posted.

My new obsession is chalkboard stuff. I had to create an entire pinterest board to all the great ideas I’ve been seen.

Well, I decided I wanted one for the front of my fireplace, but it needed to be big.

Like 36″ x 33″ big.

Supplies needed: a board (did I mention mine is big?)

Chalkboard paint and a roller (I cheated, no roller pan, just poured some paint on and rolled it out)

Chalk, Chalk markers, stencils, and/or good penmanship

 So I put hubby to work cutting a big piece of board, and had him round the corners.

Also had him put a heavy-duty hanger on the back, since I will remove it from its perch to change the message often.

If you are going to put it where youngen’s will be using it, try hanging it with mirror clips

It will be flush on the wall and not “wiggle” when they write on it.

IMG_1823

I also got some chalk, chalk markers, and stencils (options are good, considering this is a new adventure)

I’m not thrilled with my writing skills, but hopefully they will improve with some practice.

That’s the beauty of a chalkboard, right? I can erase it and start over.

So, a couple of tips I found online: be sure to do two thin coats of the chalkboard paint

on your board and let it dry at least 24 hours between each coat.

Be sure to wait another 36 hours before you write on it.

The paint is kinda “soft” and if you write on it too soon, those overeager messages will be imbedded forever.

IMG_1824

It’s recommended that you “season” your board before you start using it. So, I took some super cheap plain white chalk and rubbed it all over the board.

Easy enough, but I recommend doing this outside, since it left a lot of dust!

Cover your entire board, and then wipe it off, repeat. I used about 5 sticks of chalk, and did it three complete times.

IMG_1828

it really does give it a nice “used” look, and smooths out the surface before you begin creating your masterpiece.

For lettering, I used a yardstick to keep myself somewhat straight. It’s a little harder than I anticipated.

Kudos to those school teachers who have perfect vertical penmanship!

IMG_2042

We’re planning a June Wedding, and since I’m the Mother of the Groom, guess what the rehearsal dinner theme is….??

Stay tuned for more projects!

Enjoy!

Debbie

Holiday topiary trees

IMG_1555

Wait? that is a tomato cage? Really? Not all home “crafts” have to be homemade looking. Just upgrade the idea.

So I have this arbor in front of my garage, and apparently rampant, hungry, zombie deer herds roaming my front yard. Seems no matter what I planted in these planters, the mutant deer devour it. I love seeing them and their babies each spring, but nursery bought food is killing me!

So why not, make “fake” trees (can’t possibly taste good right?)

But problem is, the pre=made ones are up to a hundred bucks each, and if you want them 4 ft tall, even more.

Birth of an idea, why not make them, so I did.

IMG_1554

In fact, I made two!

Supplies Needed:

I used 4 tomato cages (doubled up for more stability and tie on places)

Net lights ( 2 sets)

twinkle light 200 cot ( two sets)

Iced Pine garland (4 from Michael’s but they were bogo)

large pine garland 200 feet

zip ties

wire and wire cutters

IMG_1529IMG_1527

So I had the garland from previous years. It was a really nice iced pine with pinecones already attached. Been keeping it in the garage looking for a new use for it because it proved to be “messy” the ice crystals kept falling off my shelves. seems like outdoor would work better.

IMG_1526

I started by putting the two tomato cages on top of each other twisting them so I had more places to tie to. I used a piece of wire to secure the tops together into a pointy cone shape.

IMG_1530

Next I added the net lights. Plain white, but you could do whatever style you like. Since I like a little twinkle outdoors, I also put a couple of strands of blinking ones over the net lights. I figured more the merrier!

IMG_1531

So I started from the top down, since I thought if I ran out, the planter would hide the bottom, with the iced pine. Using zip ties to secure, I wound the garland around leaving some space. If you have enough “fancy” garland you could wrap it snugly. Once these were on, I went back from the top with the plain pine garland and continued to fill in the empty spaces with it. You can tie with the zip ties, and weave into the cage as well.

IMG_1555IMG_1554

I put them into the planters, used some garden staples to secure them and a couple short shepherds hooks. They’re a little light, and the wind knocked them over a couple of times, but now they’re secure! Think the came out pretty realistic, I have spotted the “herd” checking them out. If they eat these, I give up!

Enjoy,

Debbie